Luxury bathroom remodels range from $25,000 to $55,000, which makes budget-friendly renovations seem out of reach for anyone wanting high-end results. Custom showers can cost up to $20,000, while freestanding tubs typically cost between $1,200 and $10,000. The good news? You don’t need to empty your savings account to achieve that expensive look. Topic: (budget bathroom remodel 2025)
Homeowners can create stunning bathroom transformations for just $2,000 when they plan smartly. Simple strategies like ceramic tiles that mimic marble’s elegance and affordable multi-function showerheads ($50-$100) create impressive results without breaking the bank. This piece reveals affordable bathroom remodel ideas that give your space a $20,000 appearance on a modest budget. These techniques demonstrate how your bathroom can look luxurious without compromising style or quality through surface upgrades and clever lighting solutions.
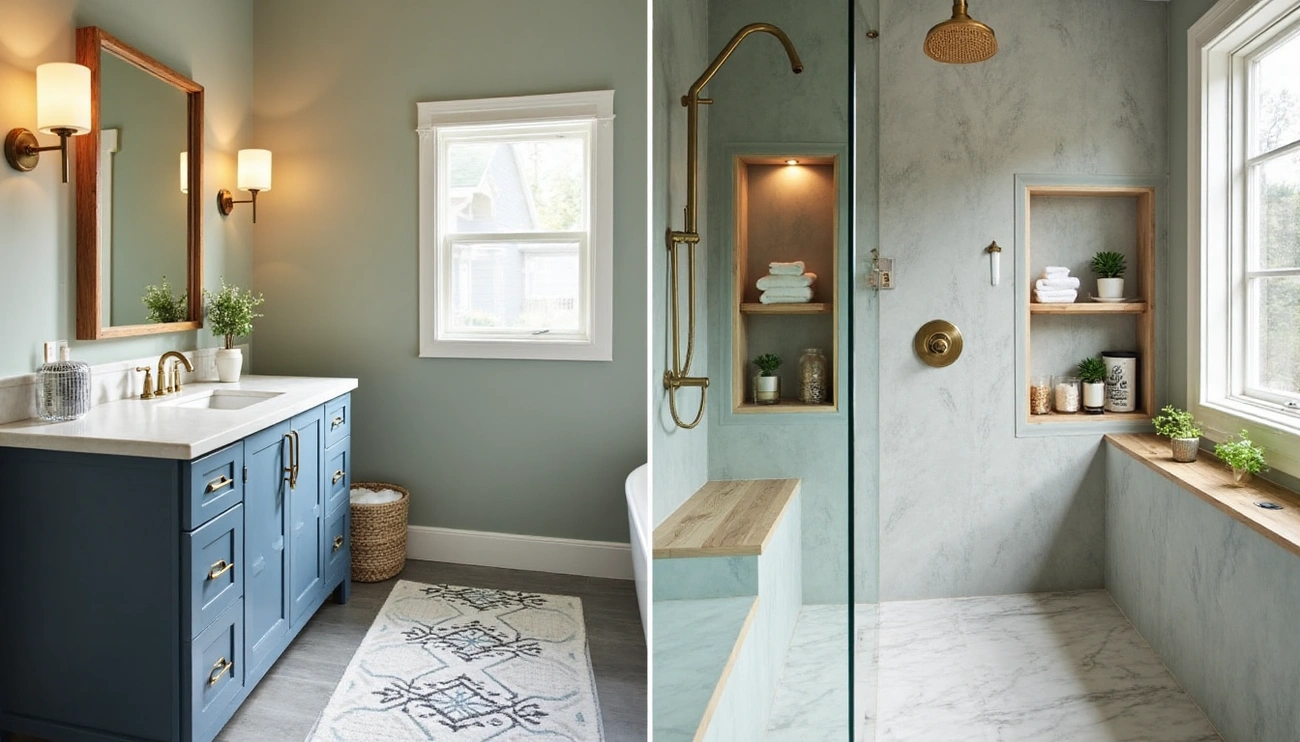
Surface Upgrades That Look Expensive

Topic: budget bathroom remodel 2025
Image Source: Ultra Stones
Your bathroom’s surface changes make the biggest visual effect at the lowest cost in any low cost bathroom remodel. The right materials and colors can lift your space without emptying your wallet.
1. Use ceramic or porcelain tiles that mimic marble
Marble-look tiles give you timeless elegance of natural stone at a fraction of the price. These ceramic or porcelain tiles showcase realistic veining patterns that look like luxurious marble without the big price tag or maintenance headaches. Porcelain marble-look tiles usually cost between $2.00 and $30.00 per square foot, and ceramic options range from $2.00 to $20.00 per square foot.
These tiles are exceptionally durable and easy to maintain. Natural marble needs regular sealing and special cleaning products, but marble-look porcelain resists wear, stains, and moisture. Bathrooms need the right finish – matte-finished tiles work best for floors because they prevent slipping, while glossy tiles on walls create depth and visual interest.
2. Add a tile rug for a designer floor look
A tile rug creates a stunning focal point that looks like an expensive custom design. This designer feature uses patterned tiles framed by simpler surrounding tiles to break up neutral flooring without replacing the entire floor.
Design experts suggest that “When creating a tile rug, frame the space with smaller mosaics, linear-shaped tiles, or 6 x 6 square tiles“. Your tile rug makes the biggest statement when placed in a key spot—under a freestanding tub, in front of a vanity, or right in the bathroom’s center.
3. Paint walls with rich, spa-inspired colors
Paint gives amazing value in any budget bathroom remodel. It costs little but changes everything. Rich colors can create that luxury spa feeling you want.
Top designers suggest these color families for spa-like spaces:
Soft neutrals and muted greens create a natural, calming environment
Watery blues bring ocean tranquility
Deep, rich colors like navy or charcoal add a cozy, enveloping feeling
Light plays a crucial role in color selection. Lighter colors brighten spaces with little natural light. Bathrooms blessed with plenty of sunlight can handle darker, more dramatic shades.
Your inexpensive bathroom remodel looks most impressive when paint colors match existing fixtures. This creates the seamless look you see in high-end bathrooms.
Fixtures That Feel High-End Without the Price

Topic: budget bathroom remodel 2025
Image Source: Decorilla
Fixtures are the priciest parts of bathroom renovations. They are a great way to get budget bathroom remodel savings that make a big visual difference. Smart upgrades to these key pieces create an upscale look without the high costs.
4. Refinish your bathtub instead of replacing it
A new bathtub installation can cost over $3,000. You could save money by refinishing your existing tub. Professional refinishing costs between $300 and $600, while DIY kits range from $40 to $100. Your tub will look brand new and last 10-15 more years.
The process includes cleaning, fixing minor damage, adding bonding agents, and spraying special acrylic coatings. This method avoids the mess of demolition and extra costs like plumbing work and retiling that come with replacement. Antique fixtures keep their unique charm while getting a modern update through refinishing.
5. Install a multi-function showerhead
Multi-function showerheads bring luxury spa features at budget-friendly prices. Models with 6-8 spray settings give you rainfall, massage, and mist options that were once found only in expensive bathrooms.
The AquaCare High-Pressure 8-mode Handheld Shower Head stands out as a quality choice at a reasonable price. Many affordable models now come with antimicrobial, anti-clog nozzles that stay clean longer. You won’t need special tools or skills – just unscrew the old head and attach the new one.
6. Upgrade your vanity with paint and new hardware
A vanity makeover can change the whole room without breaking the bank. Cabinet-grade paint like Sherwin Williams Emerald Urethane Trim Enamel in semi-gloss gives you a tough, wipeable finish that looks custom-made.
The painting process involves:
Taking off doors, drawers, and hardware
Cleaning surfaces with deglosser
Light sanding with 220-grit sandpaper
Using bonding primer like INSL-X Stix
Putting on 2 coats of quality paint
Topic: budget bathroom remodel 2025
New hardware acts like jewelry for your vanity and updates its style instantly. Fresh pulls and knobs cost just $3-5 each and can give your bathroom a whole new look for under $100.
Lighting and Tech for a Luxe Ambience
Smart lighting choices make a dramatic difference in any low cost bathroom remodel. They give you the best value for money and change how your space looks. You can find modern lighting options that work well and set the right mood without breaking the bank.
7. Add dimmable LED strip lighting
LED strip lights turn regular bathrooms into spa-like spaces with their adjustable, indirect light. These flexible strips stick easily to many surfaces. A roll costs between $15-$40, depending on how long it is and what features it has.
The best spots to put these strips are:
Around mirror edges so you can see yourself clearly
Under floating vanities to create a luxury floating look
Inside shower niches to show off toiletries or decorative items
Along cove or crown molding to light up the ceiling
The real magic comes from being able to dim the lights. Dimmable strips let you set the brightness just right – bright light for morning routines or soft glow for evening baths. You can pick from basic manual dimmers ($10-$30) or smart ones that work with your phone ($25-$50).
8. Use smart mirrors or smart bulbs for modern flair
Smart lighting brings high-end tech to any budget bathroom remodel. This technology used to be only in expensive bathrooms.
Smart bulbs are really versatile. You can change both brightness and color temperature through the day – warm, cozy light at night and energizing cool light in the morning. Basic smart bulbs start at $15-$25, while ones that change color cost $25-$45.
Smart mirrors do much more than just show your reflection. You can find entry-level options with LED lights and Bluetooth speakers for $100-$200. That’s nowhere near the cost of custom backlit mirrors. These mirrors come with different lighting modes (warm, natural, cool) to help you look your best.
Voice commands or smartphone apps let you control your lighting in your inexpensive bathroom remodel. This gives you that luxury feel without the big price tag. You can set up customized scenes and schedules that change automatically throughout the day. This kind of convenience used to need expensive home automation systems.
Accessories That Elevate the Space

Topic: budget bathroom remodel 2025
Image Source: Architectural Digest
Small accessories create the biggest difference in any budget bathroom remodel. These luxurious touches belie their modest cost. The finishing elements distinguish high-end spaces from simple bathrooms with their cohesive, designed look.
9. Frame your existing mirror with wood or metal
Builder-grade mirrors without frames reveal a bathroom’s budget limits right away. A frame around your existing mirror creates dramatic results with minimal investment—usually between $20-$40 for materials. This quick upgrade turns a simple functional piece into a design statement without mirror replacement.
Primed MDF boards work great for DIY mirror framing because of their smooth surface and low cost. You’ll need just three boards at about $7 each to frame a standard mirror. MDF’s pre-primed surface saves you an extra preparation step.
The project starts with measuring your mirror’s dimensions. Next, cut the boards with mitered corners for a professional look. Attach them directly to the mirror using special construction adhesive made for mirrors. Paint both front and back edges of your frame boards since the mirror shows unpainted areas.
10. Add floating shelves for storage and style
Floating shelves employ wall space smartly in bathrooms of any size. They create storage without taking up floor space. These architectural elements work double duty—they display decorative items and keep essentials close by.
Smart shelf placement makes all the difference. Try installing them above the toilet, near the vanity, or in empty corners. Glass shelving helps smaller bathrooms feel more spacious.
Your choice of materials and hardware affects both looks and longevity. Simple shelf brackets with pine boards offer a budget-friendly option at roughly $30 per shelf. Bathroom environments need special moisture-resistant hardware. Wood needs a good polyurethane seal.
Shelf styling works best with a mix of pretty and practical items. Keep daily essentials in decorative containers that match your bathroom’s colors. This approach hides necessary items while maintaining a neat, coordinated look.
Conclusion
Your budget shouldn’t limit your bathroom renovation dreams. This piece explores practical strategies that give you luxurious results while keeping costs in check. You can definitely achieve impressive changes through smart material choices, surface upgrades, and carefully picked accessories that look like high-end design elements.
Surface changes give you the most dramatic effect for minimal investment. Marble-look ceramic tiles, decorative tile rugs, and well-chosen paint colors create designer looks without premium costs. These updates reshape how people see your space, making budget-friendly materials look way more expensive than they are.
Fixture upgrades give you big results compared to their modest costs. Bathtub refinishing creates a like-new look at roughly 15-20% of replacement costs. On top of that, affordable yet sophisticated hardware can turn dated vanities into custom-looking centerpieces. Smart choices about showerheads improve daily use without needing extensive plumbing changes.
Transforming Your Bathroom Without Breaking the Bank
Lighting plays a crucial role in any budget renovation plan. Smart LED placement creates an ambiance once found only in designer bathrooms. Modern technology like smart mirrors and programmable lighting turns ordinary spaces into contemporary retreats. These small investments change how the entire space feels and works dramatically.
Accessories end up completing the luxury transformation. Simple additions like framed mirrors and floating shelves add finishing touches that set high-end bathrooms apart. These elements don’t cost much yet contribute substantially to the cohesive, designed look that makes expensive bathrooms special.
These ten strategies produce remarkable results together. You can create spaces that look like they cost $20,000 or more while staying within a $2,000 budget by doing this and being systematic. This visual return on investment makes bathroom renovations more rewarding than other home improvement projects.
Start your renovation by focusing on your bathroom’s specific needs and existing features. All suggestions bring value, but focusing your original efforts on highly visible surfaces and fixtures gives you maximum impact. You can tackle lighting and accessories later as your budget allows.
Your bathroom transformation doesn’t require excessive spending or professional expertise. Smart planning, material selections, and strategic upgrades help you create a space that radiates luxury without the high price tag. The difference between basic bathrooms and truly special ones often comes from thoughtful design decisions that maximize visual impact per dollar spent.
FAQs
Q1. How can I make my bathroom look luxurious without spending a fortune? Focus on surface upgrades like using ceramic tiles that mimic marble, adding a tile rug for a designer floor look, and painting walls with rich, spa-inspired colors. These changes can dramatically transform the space without breaking the bank.
Q2. What are some budget-friendly ways to upgrade bathroom fixtures? Consider refinishing your bathtub instead of replacing it, installing a multi-function showerhead, and upgrading your vanity with paint and new hardware. These changes can give your bathroom a high-end look without the premium price tag.
Q3. How can lighting enhance my bathroom’s ambiance on a budget? Add dimmable LED strip lighting around mirrors or under vanities for a luxurious effect. You can also use smart bulbs or smart mirrors to create customizable lighting scenes, adding a modern flair to your bathroom.
Q4. What accessories can elevate my bathroom’s appearance without major renovations? Frame your existing mirror with wood or metal for a custom look, and add floating shelves for both storage and style. These simple additions can significantly improve your bathroom’s esthetic appeal.
Q5. Is it possible to achieve a high-end bathroom look on a $2,000 budget? Yes, it’s possible to create a bathroom that looks like it cost $20,000 on a $2,000 budget. By focusing on strategic upgrades like surface improvements, clever fixture choices, smart lighting solutions, and carefully selected accessories, you can dramatically transform your bathroom’s appearance without overspending.
Topic: budget bathroom remodel 2025
References
[1] – https://www.stonetiledepot.com/tile/porcelain-tiles/marble-look-tiles/?srsltid=AfmBOoqQFUpDOoZdvGINgWh_-nfPJzjapPP_YW1Ag8pA2xqU-vYjQI4S
[2] – https://www.homedepot.com/b/Flooring-Tile-Porcelain-Tile/Marble-Look/N-5yc1vZb97mZ1z1clsw
[3] – https://www.marazziusa.com/style-and-design/articles/use-patterned-floor-tile-to-create-a-tile-rug
[4] – https://www.bhg.com/bathroom/color-schemes/colors/soothing-bathroom-color-schemes/
[5] – https://www.lilyanncabinets.com/cabinet-articles/bathroom-paint-colors/?srsltid=AfmBOopc5UcY2qAo5iQj07KZrefv4tcJCglzK38b20fbqifNbbOT7IBn
[6] – https://www.miraclemethod.com/bathtub-refinishing.htm
[7] – https://baystaterefinishing.com/blog/cost-guide-bathtub-refinishing-resurfacing-reglazing/
[8] – https://www.housebeautiful.com/home-remodeling/diy-projects/a41613516/how-to-refinish-bathtub/
[9] – https://www.thespruce.com/best-showerheads-4079431
[10] – https://stefanasilber.com/paint-a-bathroom-vanity/
[11] – https://lovegrowswild.com/2024/03/step-by-step-guide-how-to-paint-a-bathroom-vanity-cabinet/
[12] – https://hipandhumblestyle.com/2022/02/how-to-update-a-bathroom-vanity-on-a-budget/
[13] – https://www.flexfireleds.com/bathroom-lighting-design/?srsltid=AfmBOor14emCNSYbG7mjaClrMo2Ed9vhE4JnL1O2AGVBZ4xcQGdA17jr
[14] – https://ledsupplier.co.uk/blogs/news/the-ultimate-guide-to-installing-led-strip-lights
[15] – https://www.nytimes.com/wirecutter/reviews/best-smart-led-light-bulbs/
[16] – https://www.homeowner.com/smart-home/best-smart-mirrors
[17] – https://danubetoilet.com/6-best-smart-bathroom-vanity-mirrors/
[18] – https://medium.com/@condochance/best-smart-light-bulbs-for-bathrooms-tips-tricks-and-reviews-6a0161b66356
[19] – https://thefrugalhomemaker.com/2015/02/10/how-to-frame-out-that-builder-basic-bathroom-mirror-for-20-or-less/
[20] – https://homeandhallow.com/diy-how-to-frame-a-builder-grade-bathroom-mirror/
[21] – https://www.lowes.com/n/buying-guide/easy-to-install-bathroom-shelves
[22] – https://www.thecreativemom.com/simple-bathroom-shelf/
[23] – https://shelfology.com/blogs/shelfology-u/7-savvy-ways-to-use-floating-shelves-in-the-bathroom?srsltid=AfmBOorA_oWvw2X41wYjeQxG4kS7I6Zx-nrf7Kx6aLsQ3SA_tm5I9HVg
 By
By
 By
By
 By
By